
Have you journeyed to the springs of the sea
or walked in the recesses of the deep?Job 38:16 (NIV)
After some busy weeks — work (watch out for an update on the UTU Blog on Monday), a conference, a bad cold, but also a night sky-viewing trip to Suswa, about which I’m going to write soon — I finally get around to the promised post about viewing deep sky objects with binoculars, and shooting some pics through them with a phone.
“Deep sky” basically means anything beyond our solar system which isn’t an individual star. For instance, various kinds of nebulae, star clusters, galaxies, but also double or multiple stars. “Deep” refers to the fact that we’re looking “deeply” into space, i.e. many hundreds, thousands, or even millions of light years (ly). Where a light year is the distance that light travels within a year, which is just under 9.5 trillion km — or just really, unimaginably far.
So, how can we see these things? The answer is, in some cases, simply by looking up at night! When at a sufficiently dark location, such as in many rural places in Kenya, with no Moon or other nearby light pollution, and with the right weather with good transparency (i.e. no clouds, little humidity, dust, smoke, or other pollutants), there are a number of objects which can be seen with the unaided eye. Examples include the Orion (~1,350 ly) and Carina (~8,500 ly) Nebulae, the Omega Centauri globular cluster (~16,000 ly), or the Andromeda Galaxy (~2.5 million ly), or of course our own Milky Way galaxy.
However, expectations should be managed, as these objects will not appear at all like in the famous colourful pictures from the Hubble or James Webb Space Telescopes. They will rather appear as faint, whitish, fuzzy blobs, almost like a thin cloud. Also, while some are quite big, most appear quite small in the sky. For example, the Andromeda Galaxy is one of the largest-appearing objects, and when fully visible, is over 6 full Moons in (apparent) length. However, to see this, very dark skies and very good conditions are required. Otherwise, in less perfect conditions, one sees only the brighter core, which is much smaller1.
For the human eye, faint things are easier to see when they appear bigger, the reason why we like to use binoculars and telescopes. These optical instruments have two main purposes: 1. gather more light and 2. use that to magnify things, while keeping objects sufficiently bright. This is achieved by having a greater aperture of the objective (front lens or main mirror, depending on type of the instrument) than the human eye: the greater the aperture, the more light can be collected and redirected into the eye (or camera), and the more magnification it supports2. Therefore, in a nutshell, the greater the aperture, the more you’ll see — which explains a common phenomenon among telescope owners called “aperture fever”, the desire to get more and more telescopes with ever-greater aperture (and price tag).
However, given that the human eye’s pupil at maximum dilution, i.e. when best adapted to darkness (which happens after being about 30-60 minutes in complete darkness), is typically around 6-8mm, depending on age. Compared to this, even the 50mm aperture of a 10×50 binocular, which means 10x magnification at 50mm aperture per objective (front) lens, is a massive improvement. Consider that the area of a circle is πr2, i.e. in a square relationship to its radius or diameter. Therefore, a 10×50 binocular has almost 70 times the area of a 6mm human pupil, and can be obtained at an affordable cost compared to the cheapest useful telescopes3.
So, what does it actually look like then? Using the same setup — 10×50 binoculars, phone adapter with iPhone 12 Pro — as in my last post, I used the excellent and (currently still) free AstroShader app to take some pictures. I’ll say a bit more about how this app works below, but for now, here are some resulting pictures that I have edited in a way which very approximately resembles the view of objects as they appeared to me when viewing them through the binoculars:
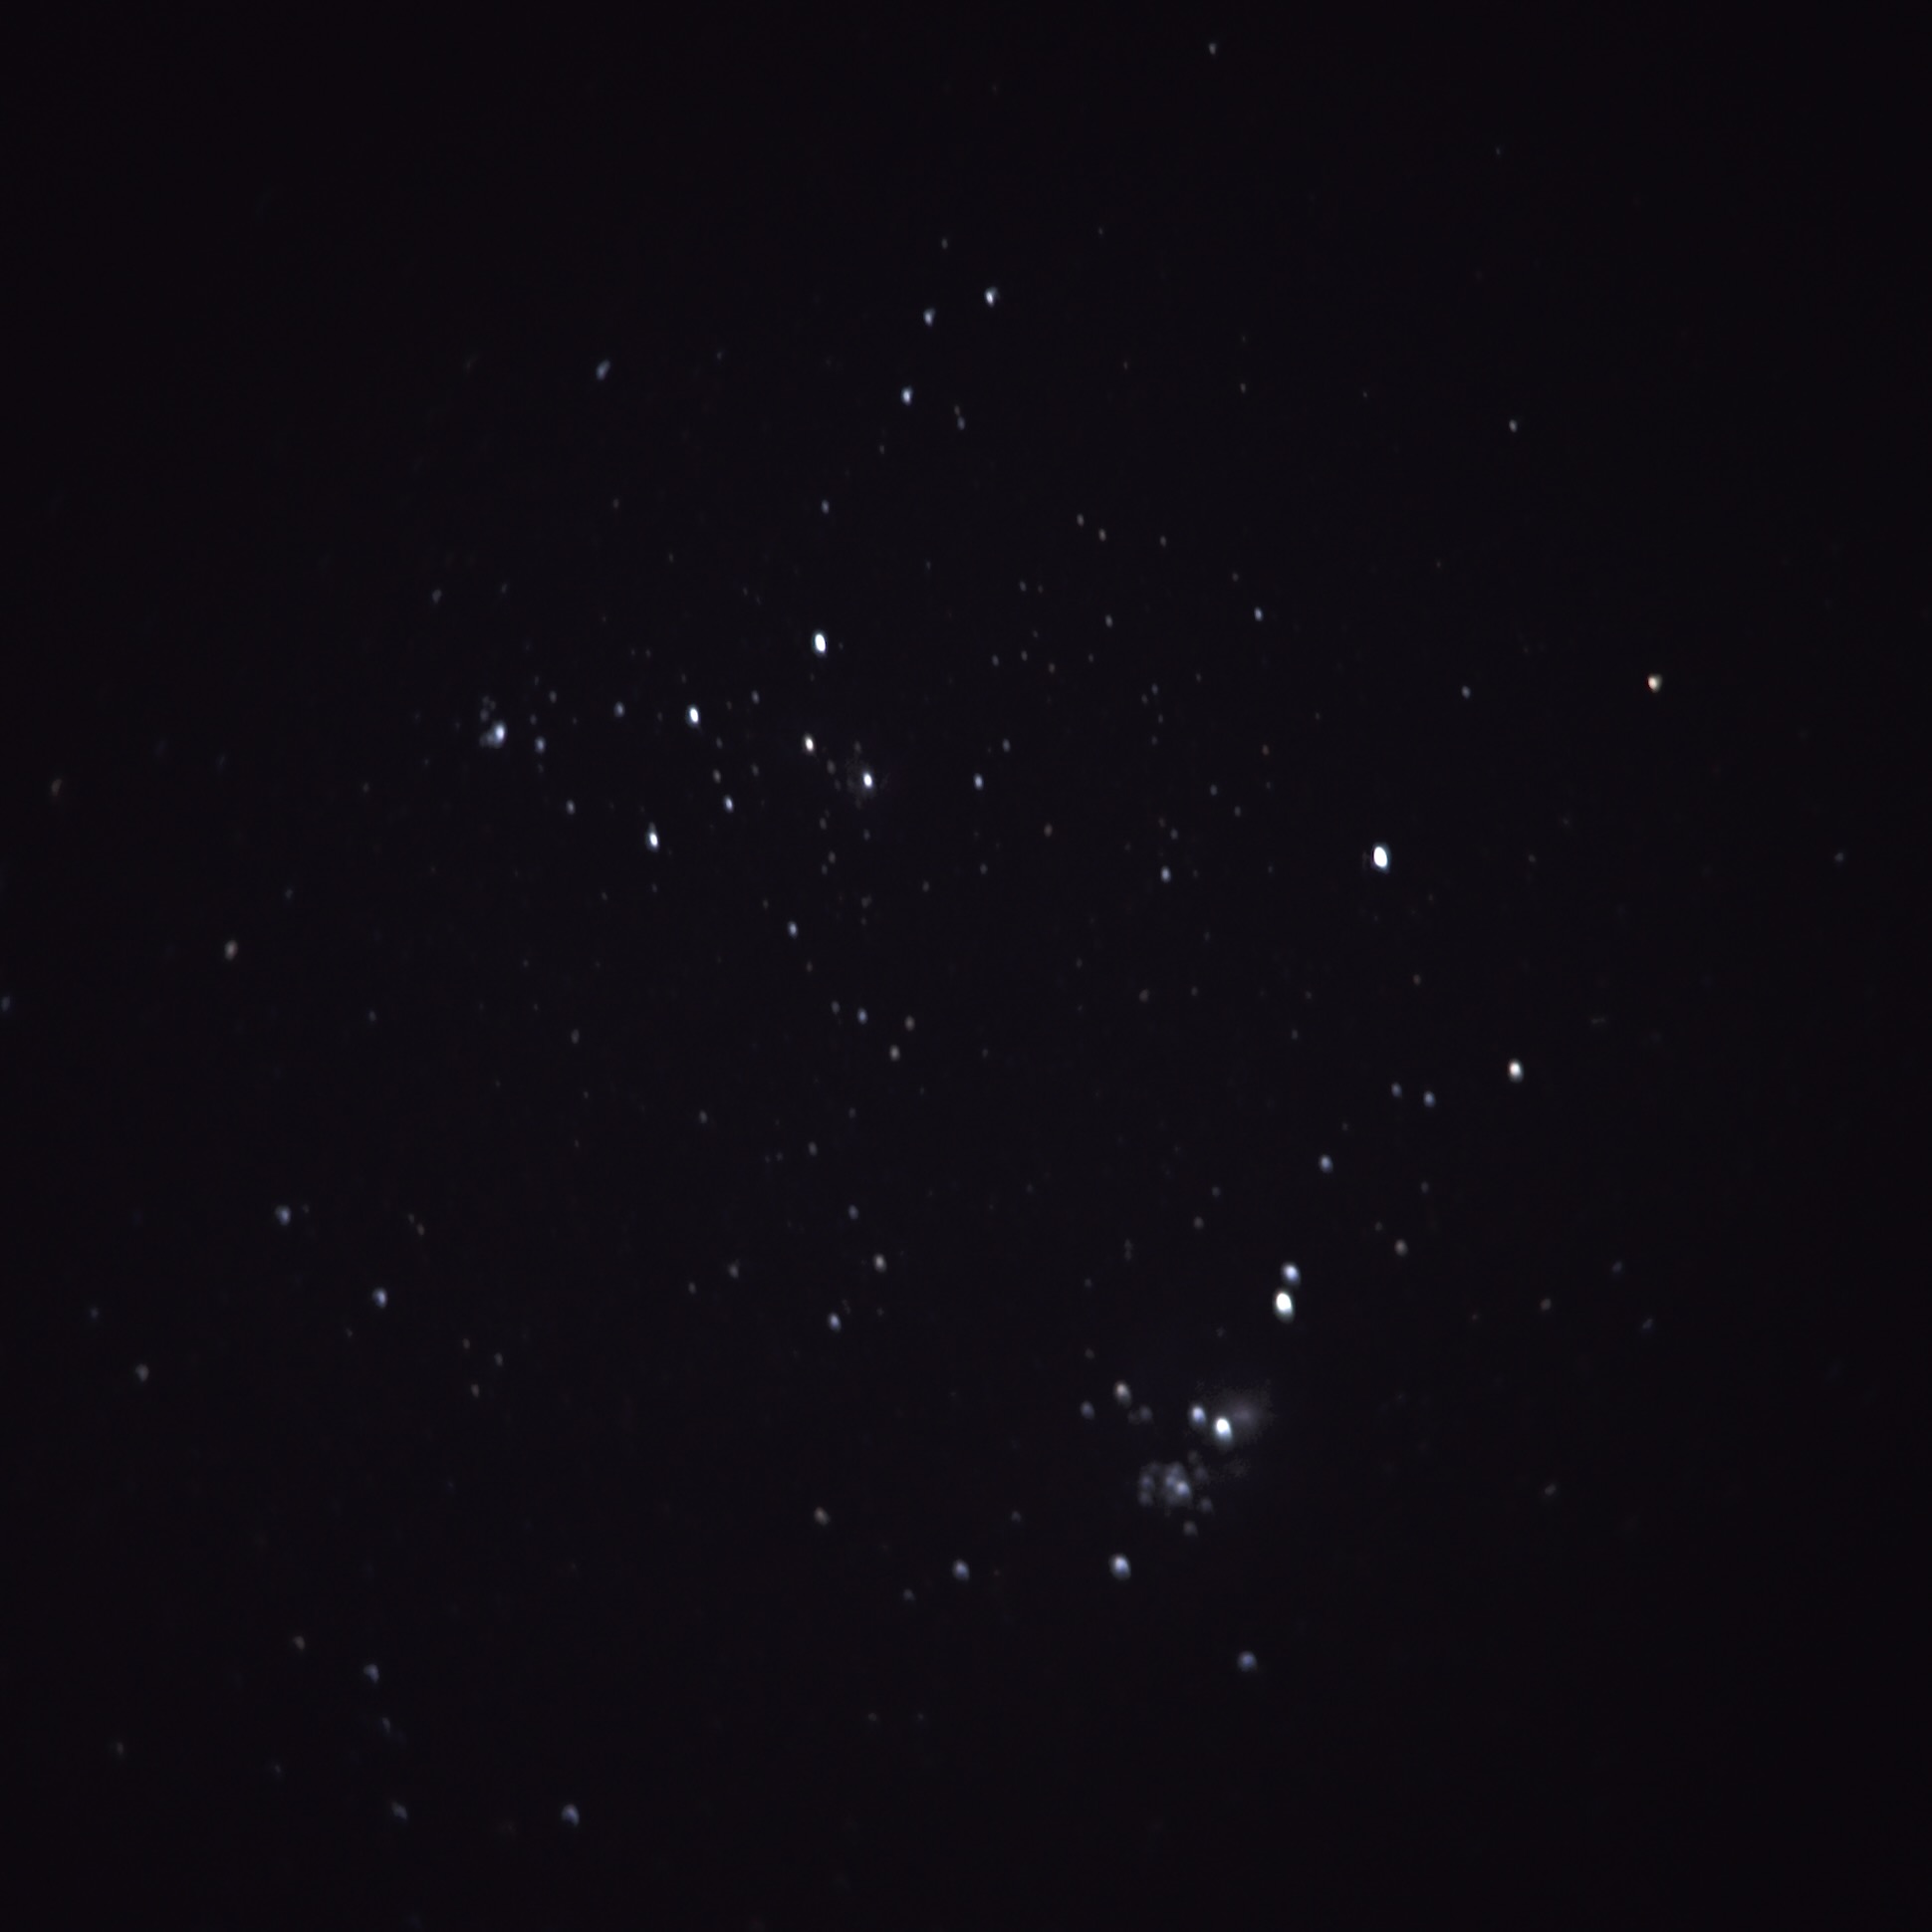
This is not a perfect resemblance of what one actually sees through the binoculars: the stars look much crisper and more brilliant in reality, and appear as points rather than discs as in this image. When taking pictures, a star’s light “bleeds out” into the surrounding pixels, an unavoidable optical effect. The brighter the star, the more.
However, the main point here is to show what deep sky objects might look like; there are two nebulae and several open star clusters visible in this image, though most of them will be hard to spot for less experienced observers (it helps to view the image in the dark, and to zoom in). Here’s a version which was annotated by Astrometry.net’s free “plate solving” service; plate solving identifies the part of sky shown in an image by recognising star patterns:
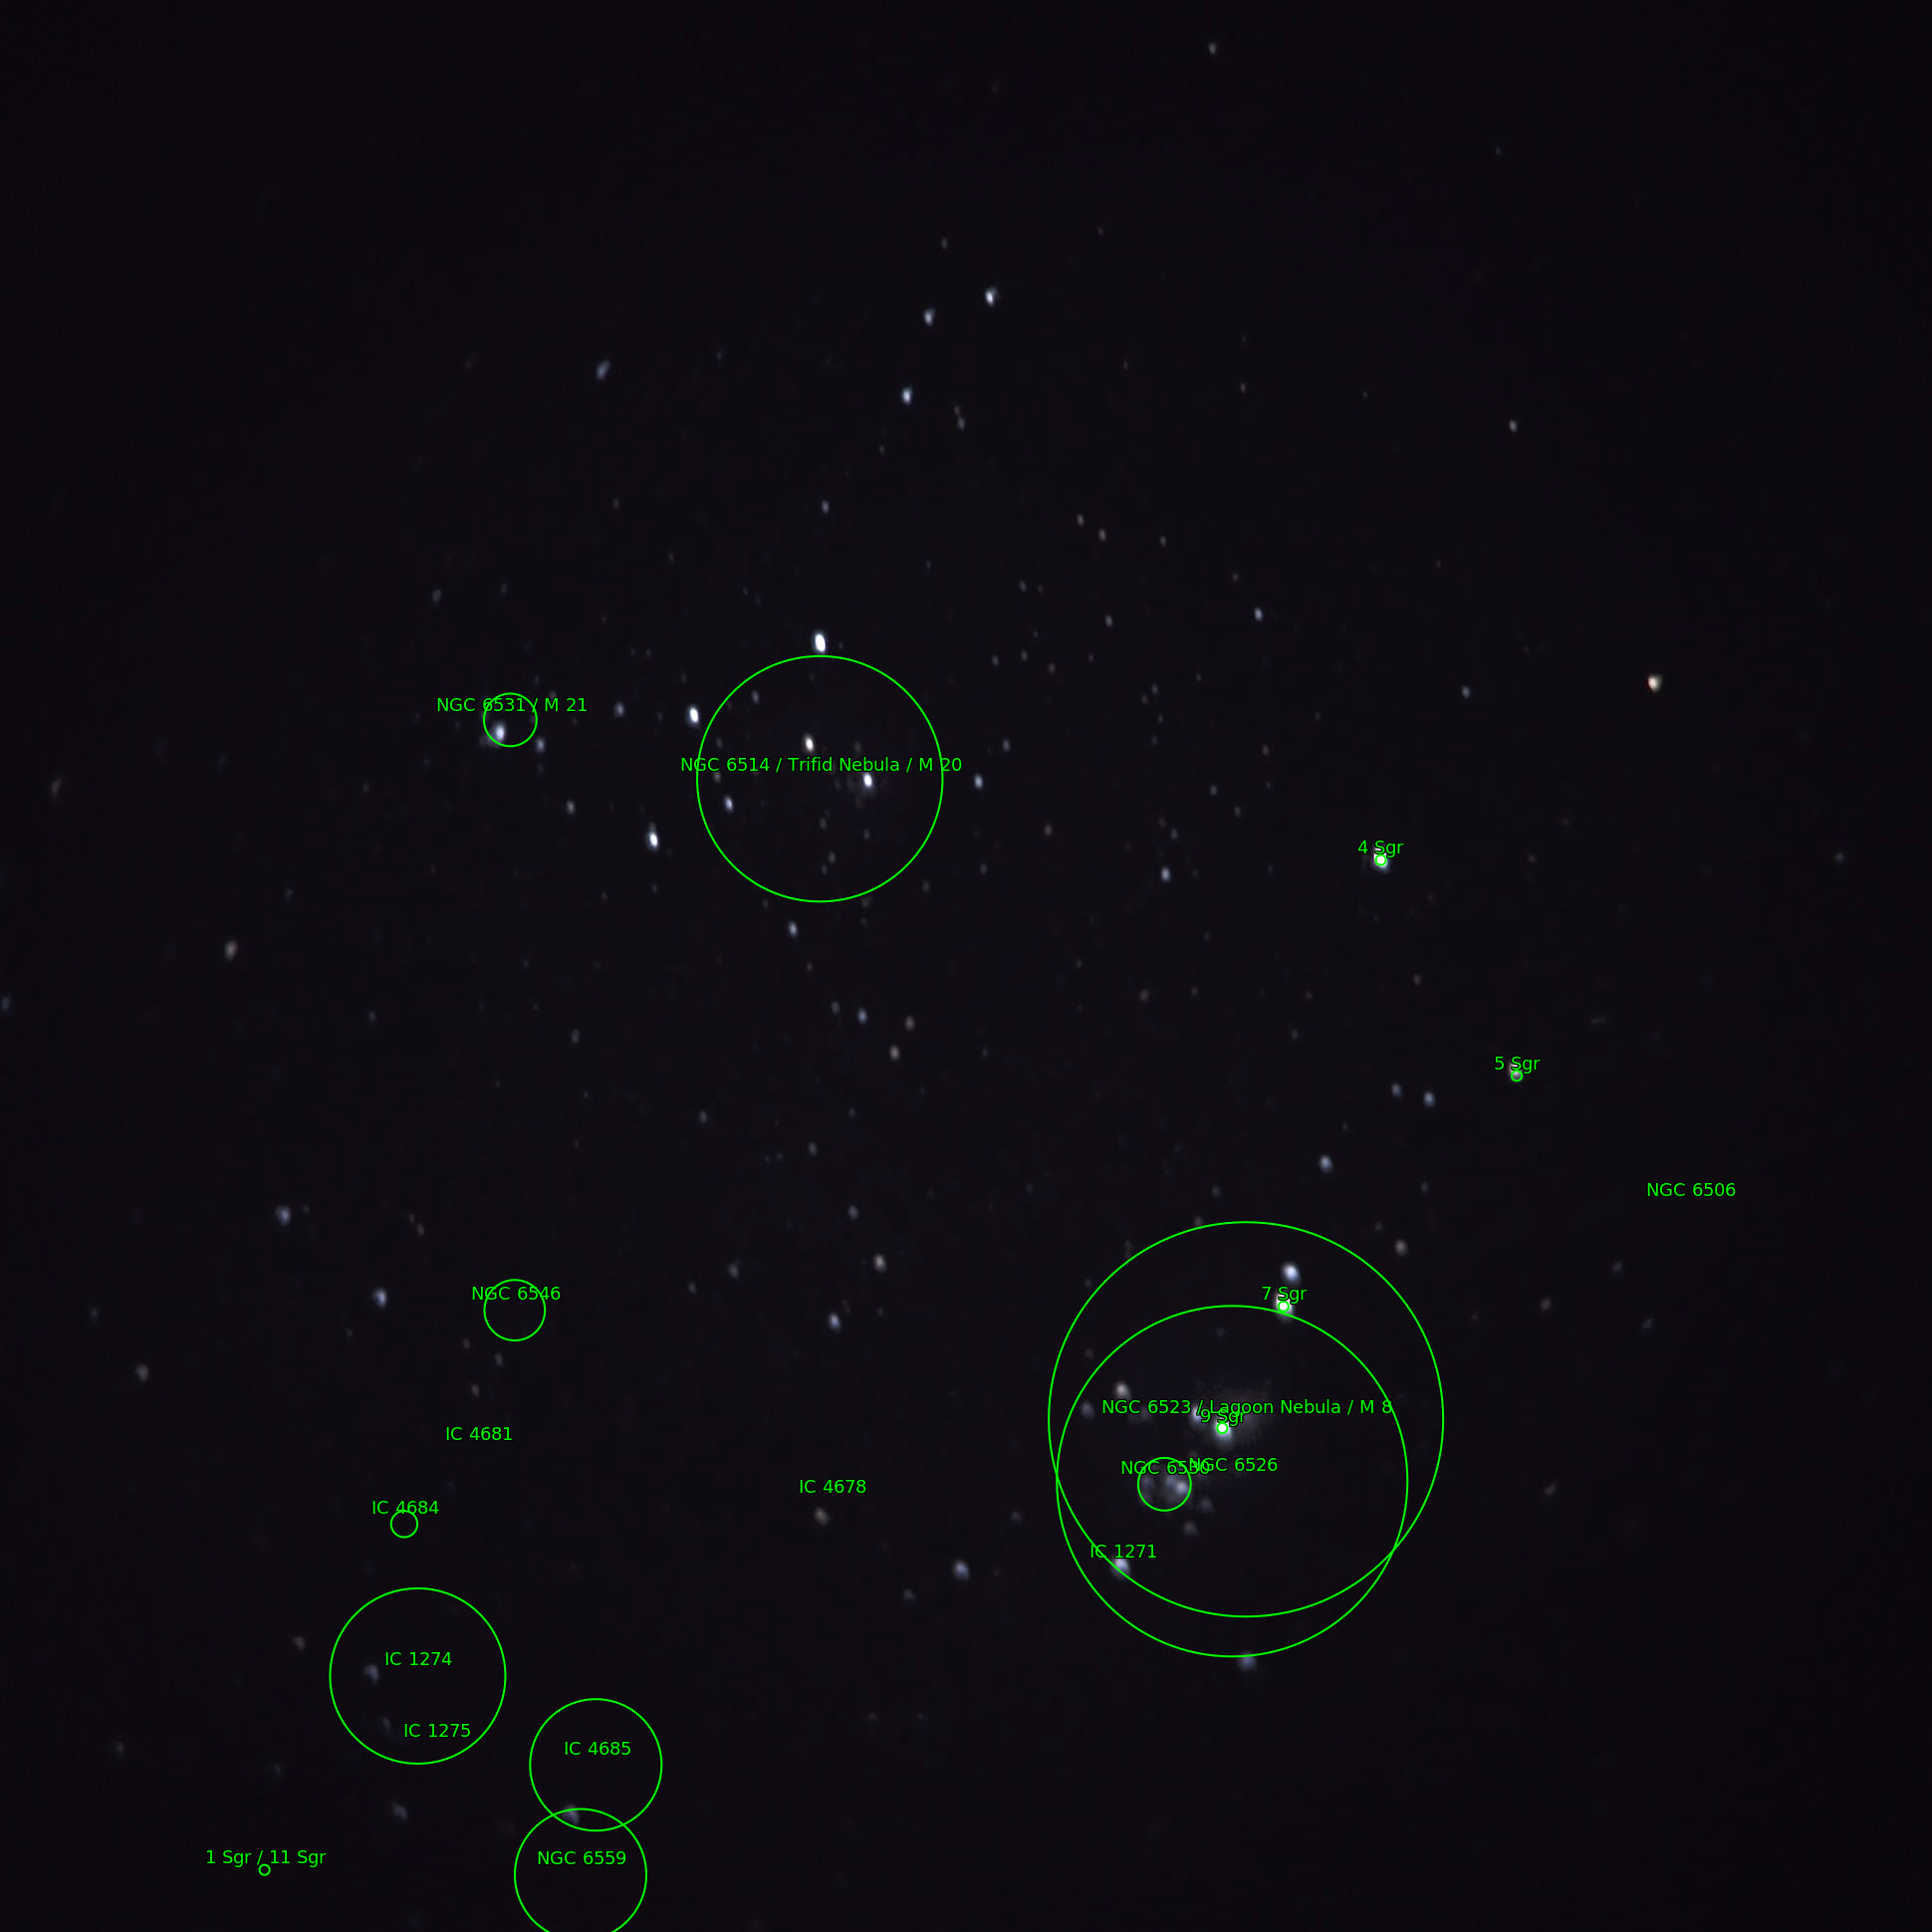
So we see that the Lagoon (M8) and Trifid (M20) nebulae are in these images, two vast gas clouds from which new stars are forming. This happens by the gas clumping together, and then collapsing under its own gravity until it becomes so dense that nuclear fusion starts in the centre of such a collapsing clump, forming a new star. In these two nebulae, this is an ongoing process, with the youngest stars found so far being less than 100,000 years old — the blink of an eye in astronomical scales. Most (all?) of these however aren’t seen in visible light yet, as they’re obscured by the remaining surrounding gas and dust. But some of the slightly older stars (a few million years — still very young in astronomical terms), which had some time to push the clouds away with their radiation, can typically be seen.
The “M8” and “M20” refer to the nebulae’s respective numbers in the Messier catalogue. Charles Messier was an astronomer on the hunt for comets, and created a catalogue of objects which are not comets, but could be mistaken for such, so as to quickly identify them and not be distracted on his hunt. Ironically, his catalogue went on to become the most popular one by far for beginning amateur astronomers on the search for deep sky objects.
Now, the appearance of the nebulae and star clusters in the above images might be a bit underwhelming. But as mentioned, the purpose was more to give an idea of how such objects might look when looking at them through binoculars, and the real view is actually quite a bit nicer; not because the nebulae appear any more obvious, but mostly because of the crispness of the real view.
But there’s another aspect, which is the awareness and appreciation of the fact that one is directly looking at objects so far away. In this case, about 4,100 ly for both M8 and M20. And the fact that the photons, which constitute their light, travelled for 4,100 years before hitting the retina in our eyes, also implies that we’re looking this same number of years into the past — we see those nebulae and stars therein as they were 4,100 years ago.
But as mentioned above, a way to make deep sky objects appear bigger and clearer is to use optical instruments with larger aperture. To get an idea what the Trifid Nebula might look like through a 14″ (35cm) Newtonian Reflector telescope, consider e.g. this sketch from a user on the Cloudynights sketching forum. Speaking of sketches, those made by skilled visual observers are generally what is best to consider to gauge how certain objects look like through certain equipment; but since I’m no good at it, I prefer to manipulate photos such as above, even if they’re less close to the actual view.
A different way to make deep sky objects stand out more is to photograph them and process the images for more contrast, details and colours. Which is actually what most astrophotographers are usually trying to achieve. It is a subject which can get as complicated (and expensive) as one feels inclined to deal with, but one can start simple, e.g. with just a phone, or a phone in an adapter on binoculars. In future posts, I will get into more details about different aspects of this process. Here, I will keep it to the very basics.
To bring out the usually very faint deep sky objects (DSOs) more, the idea is to maximise total exposure time. This is because longer exposure time generally increases the signal-to-noise ratio, where the signal is the light from the objects we want to image, while noise introduces random values seen by the camera sensor, but which don’t come from the actual light.
However, the Earth is turning, and so the objects appear to move through the sky. In order to get a sharp image, with no “star trails”, one thus either needs to move the camera (together with lens, binocular or telescope accordingly) to “track” the sky, and/or one needs to limit exposure time. In my simple setup, the binoculars were on a fixed tripod, so I had to limit the time quite significantly. I used 0.5 seconds. Now, to still increase signal-to-noise ratio, and therefore enable later editing of the image to increase contrast, one doesn’t take just one exposure, but many “sub-exposures” in a sequence. One then uses software to align the images (because the sky has moved a little bit from image to image), and then “stacks” them. Stacking means the combination of all the aligned images by averaging each pixel’s values.
There are various applications available for these (and other) tasks, mostly for desktop computers, both paid and free and open source, such as my favourite Siril. I mentioned above that I took the images in this post with the iOS app AstroShader, which does the shooting, aligning and stacking fully automated and in real time. While there are plans for a future Android version, right now I’m unfortunately not aware of a similar app for Android; but there are other astrophotography apps available, which at least allow shooting the image sequence (preferably in RAW format if supported by the phone), which one can then later process on a computer, e.g. with Siril.
Anyway, having taken, aligned and stacked 1,000 0.5-second sub-exposures in AstroShader, and then post-processed in the same app as well as the iOS Photos app, I could bring out the nebulae in the above image some more:
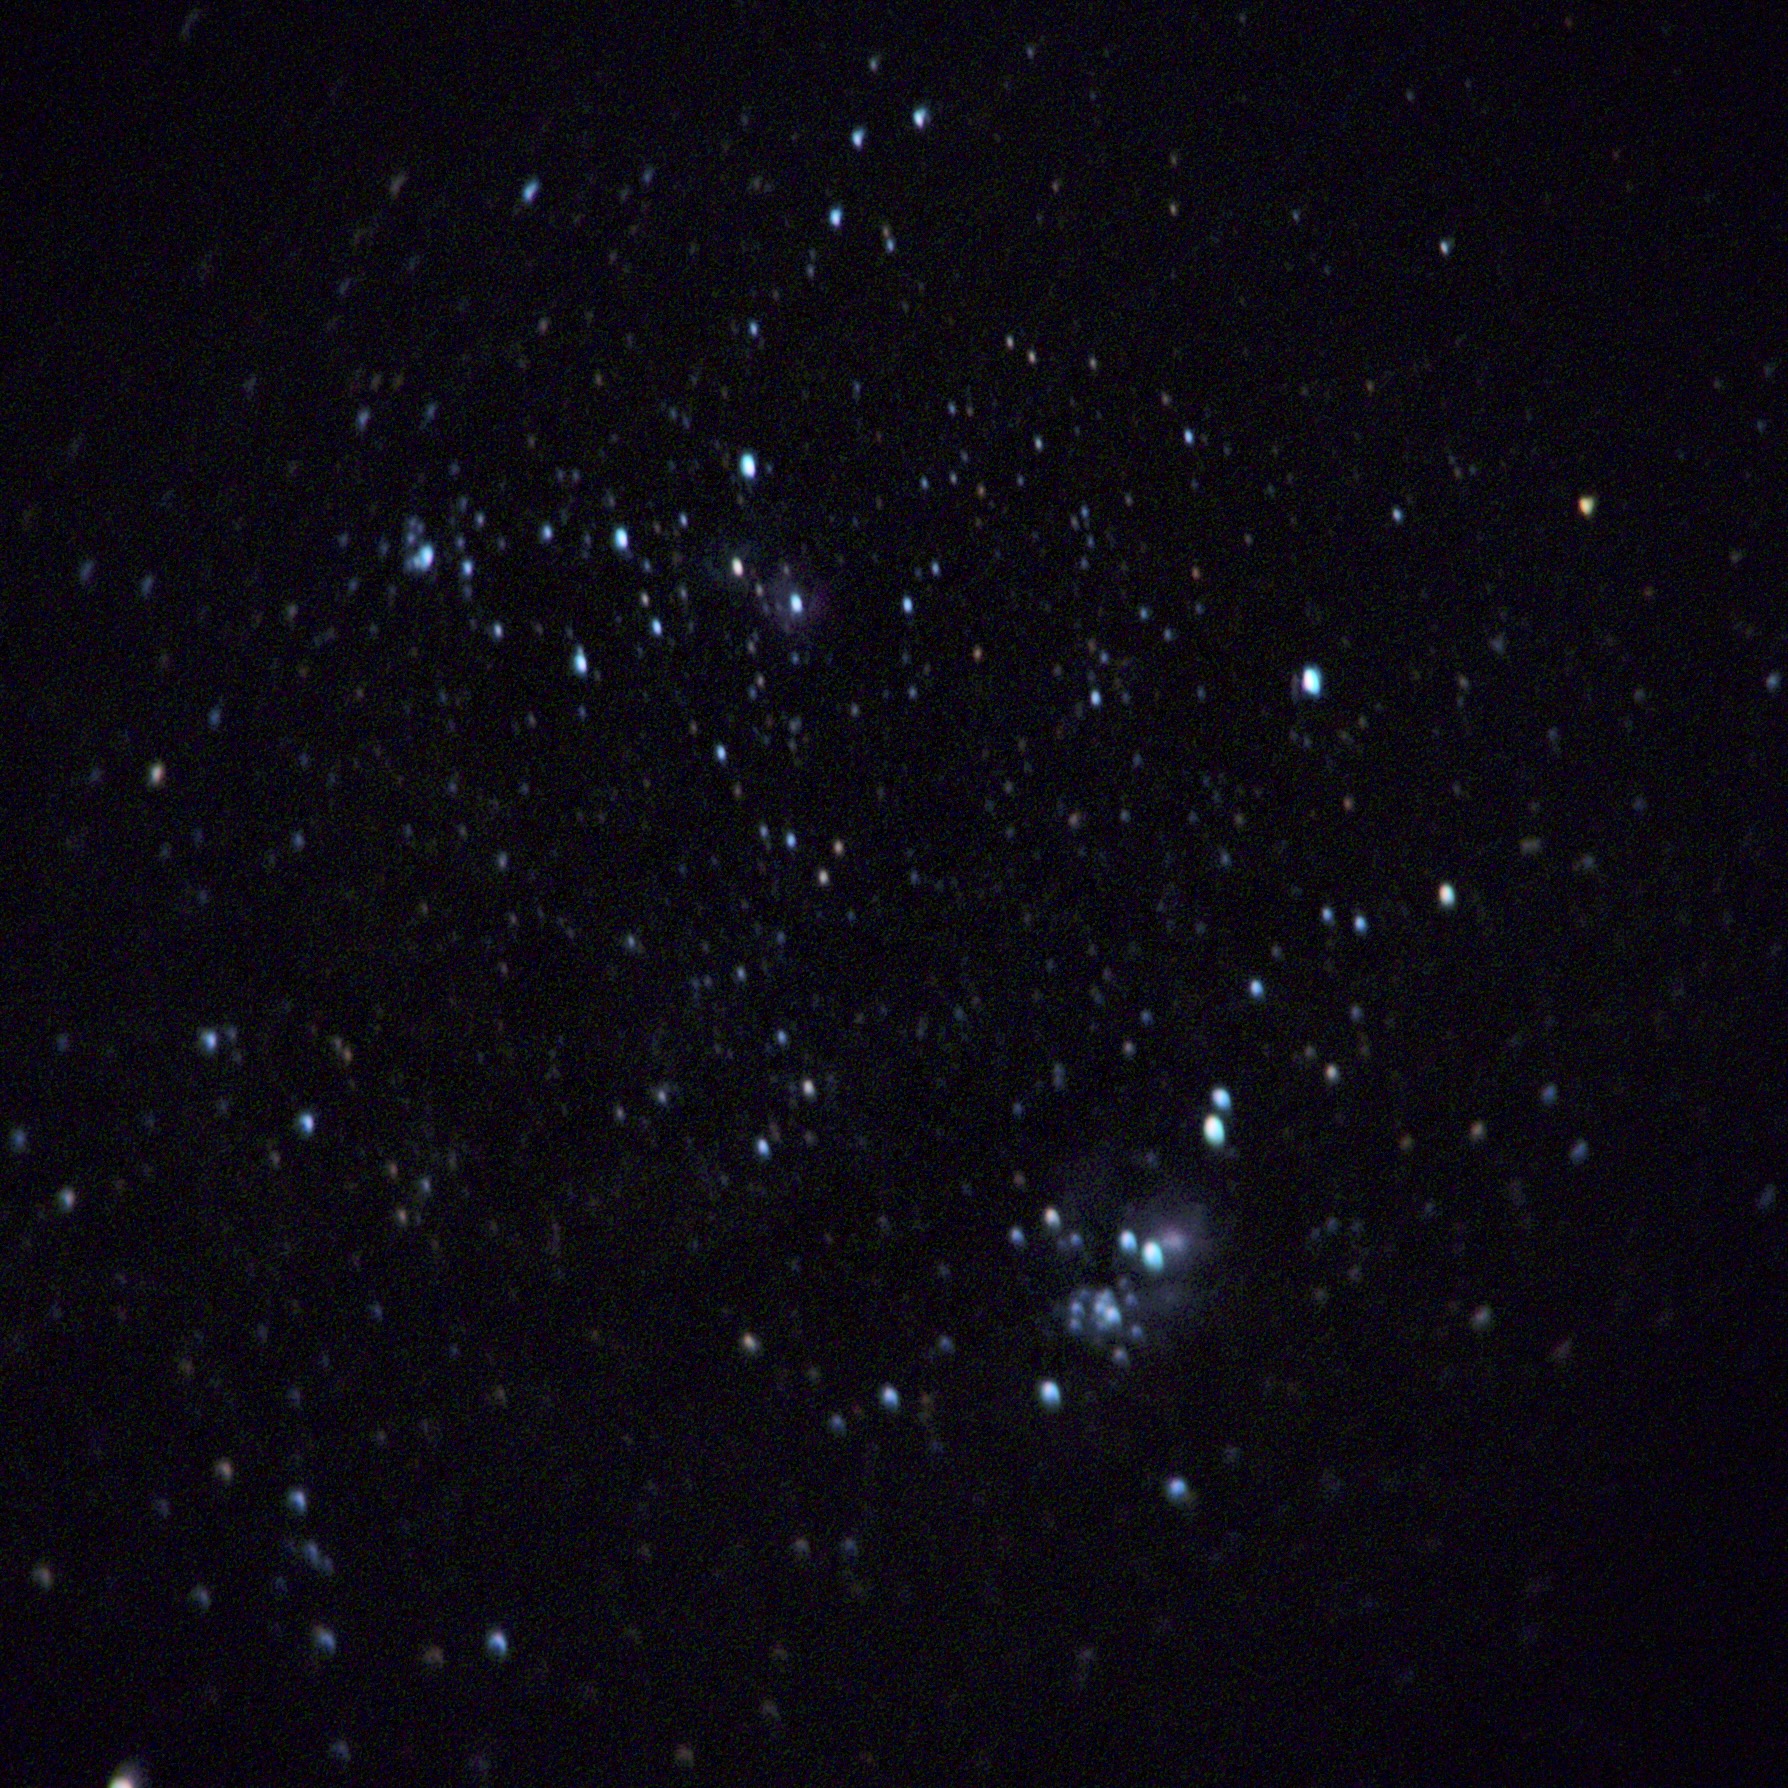
Of course, larger apertures, a more suited camera, and especially a sky-tracking mount increase the ability to take great pictures of DSOs by orders of magnitude. In future posts, I will get more into this. As a teaser, here is a picture of the same Trifid Nebula (M20) as in the above image, but taken with my 150mm Newtonian Reflector telescope with a mirrorless camera on a tracking mount:
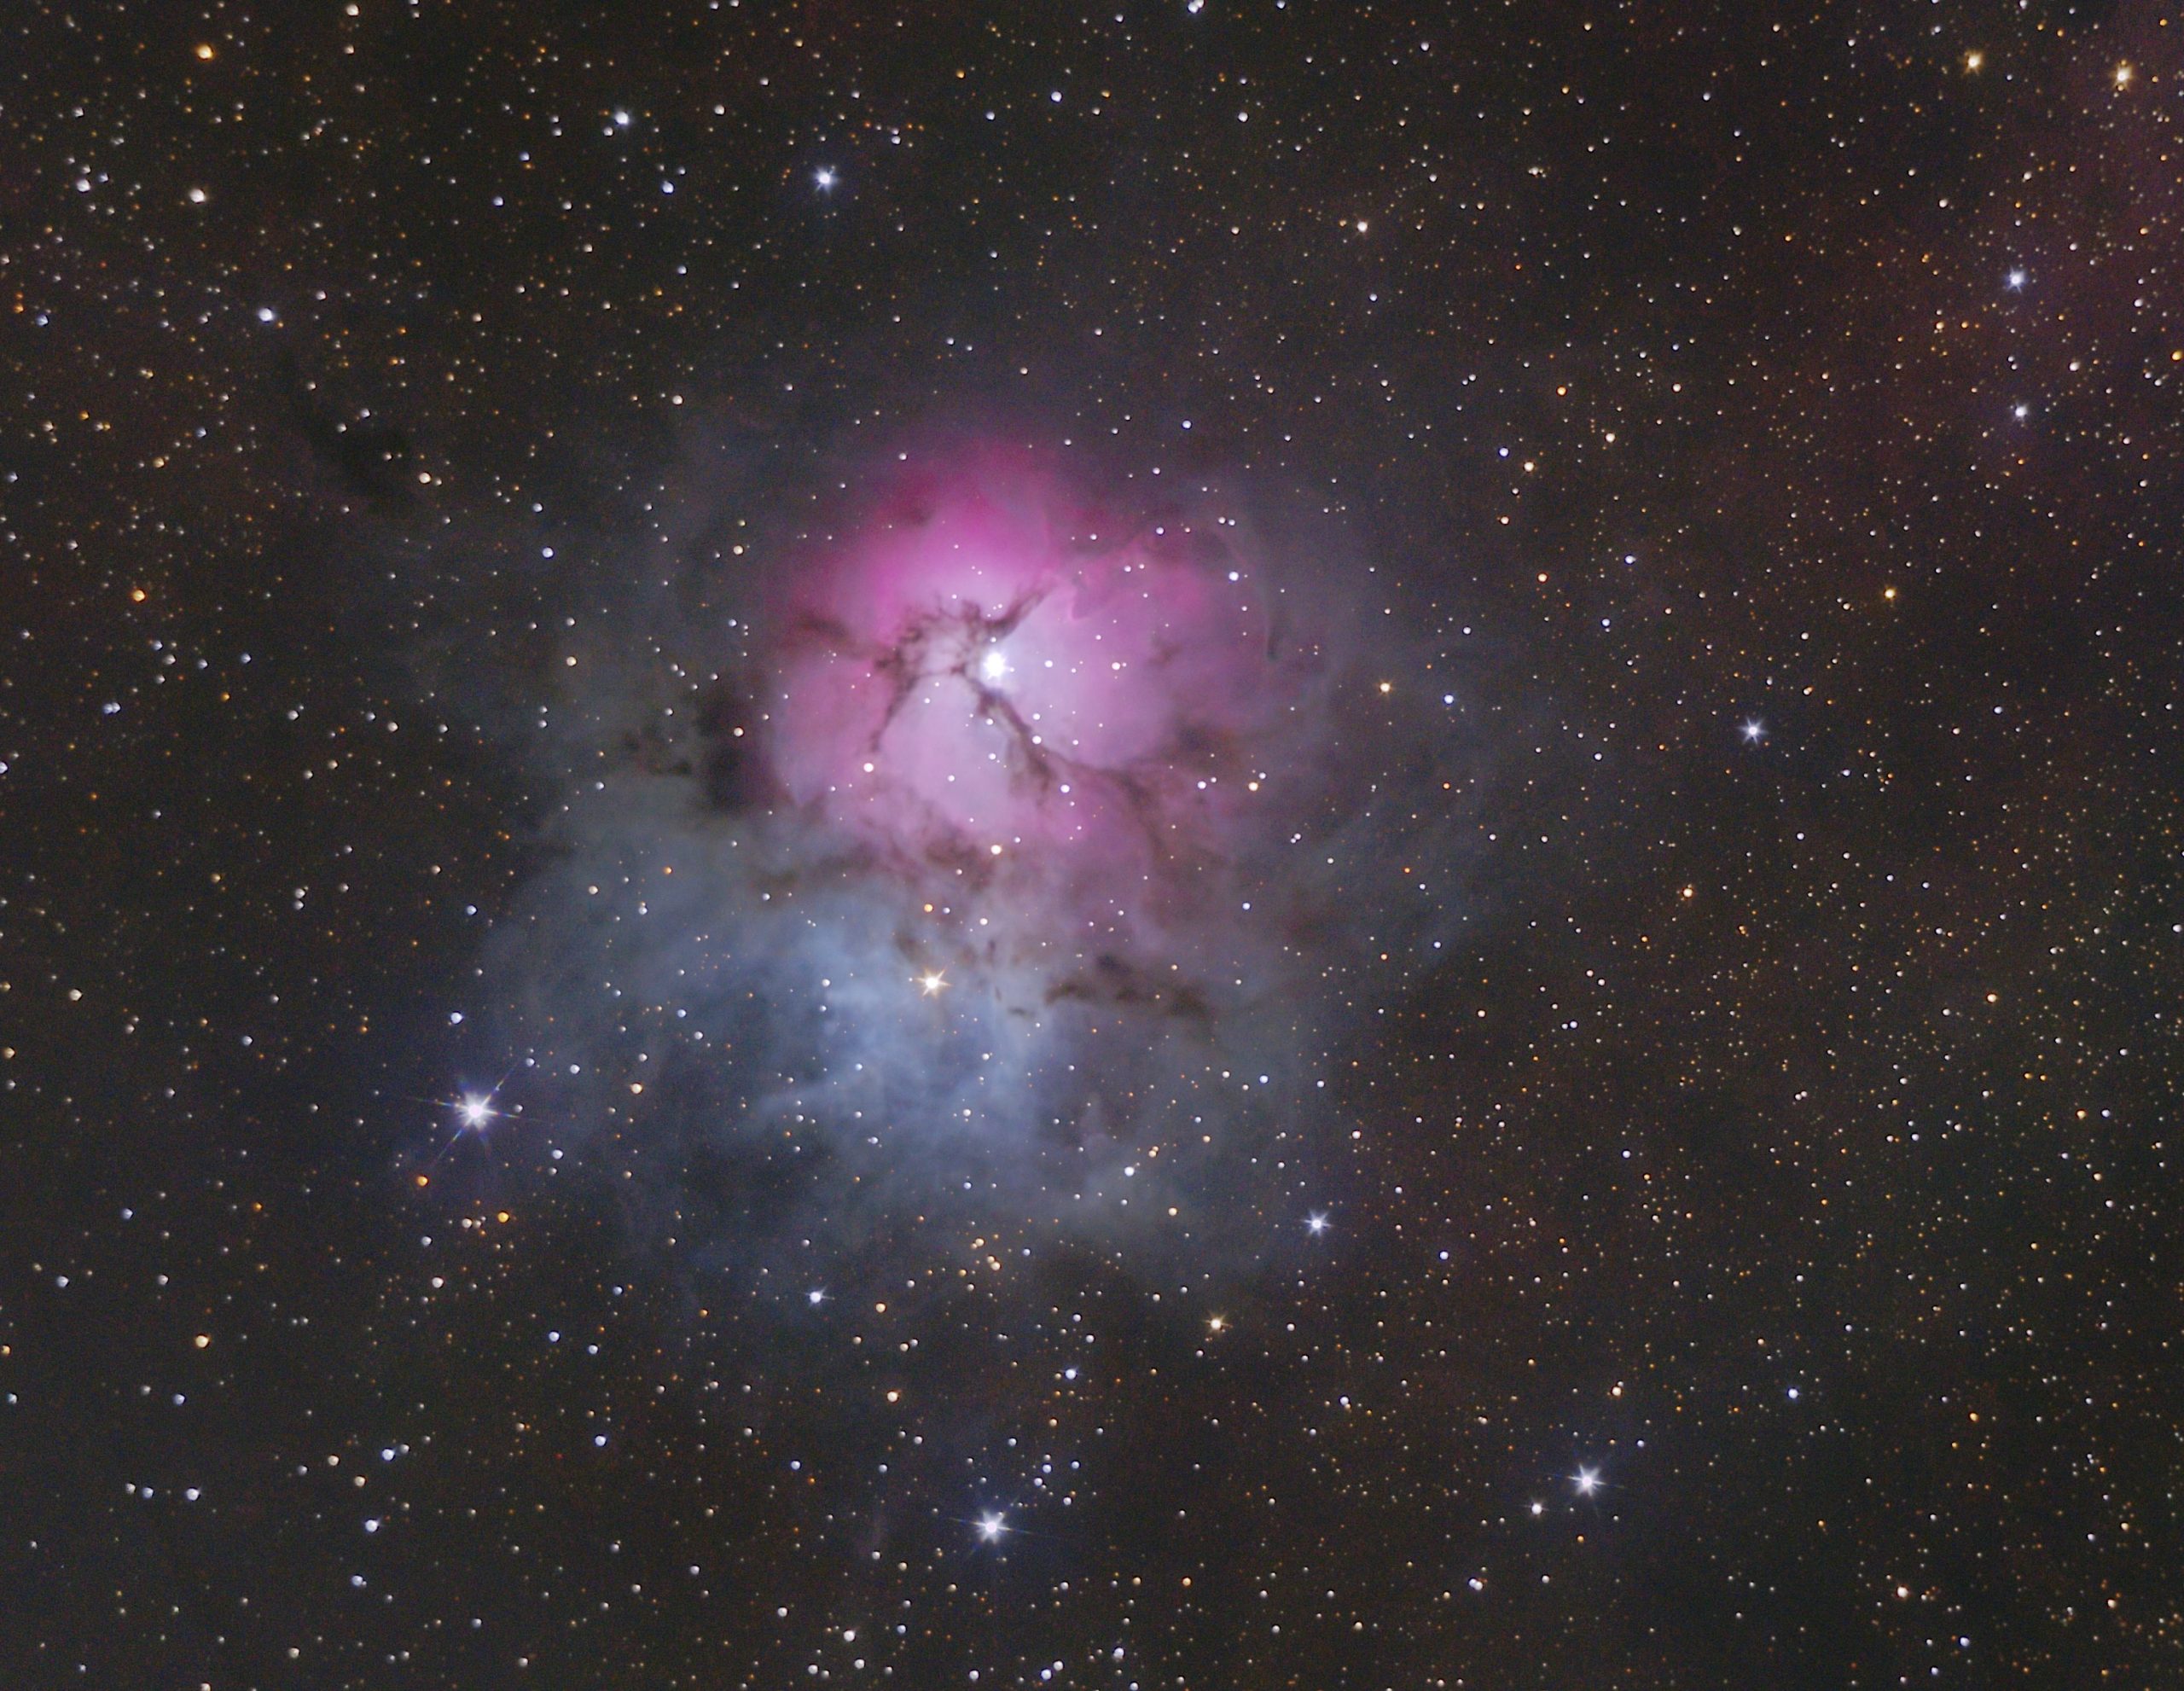
This image’s processing was actually a bit troubled, as the sky-tracking by the mount was initially a bit off. As a result, it required some extended processing to get the stars sharp, which greatly affects the apparent sharpness of the whole image. But this is a story for another post as well…
So long, clear skies.
- From cities or towns, you’ll probably not see it at all, except perhaps during one of Kenya’s frequent power cuts — it’s not a bug, it’s a feature! Though there are still the pesky “solar lights”, some models of which can’t even be switched off, which I find a truly disturbing design choice. ↩︎
- I’m simplifying massively here and in following statements about binocular and telescope properties. Because these descriptions here are supposed to just give some background for this post, which is about binocular views of some deep sky objects, and not to be a physics lecture. If you’re interested in the details, you could e.g. quick-start here. Or do an actual optics course… ↩︎
- I’ve bought mine locally in Kenya for around 13k KSh (I’m not affiliated with that shop and don’t get any reward if you buy there, I just had a good experience), though that was a few years ago, and their prices have since risen (like for most things). I’m going to write about choosing a model to start out with in more detail soon. ↩︎
This was a very enlightening read and it’s incredible to realize just how far away the stars when you look up into the night sky. The issue with light pollution came up in a discussion we had with a group of friends last week while out of town when discussing how much brighter the stars were and one of the friends has a son who is working on a project which would see buildings be smart to reduce light pollution.
Yes, light pollution is a sad and increasing problem. Especially those lights which are left on all night. But we already have simple tech which can easily help: timed switched and motion sensors. I think it’s more of an awareness and willingness problem. People believe that more light increases security, but that’s been shown to not be true in general.
A well positioned light that’s activated by a motion sensor, doesn’t blind others and doesn’t light up the sky can work well. But most people just put all-night-on spotlights, pointing outwards without much thought. My neighbour has such a light, so when I look in their house’s direction, I’m blinded and can’t see anything. So his “security” light provides a good cover for anyone breaking into his gate, hiding in the shadow there…
With the Kenyan chapter of https://darksky.org, where I’m a member, we’re planning to produce a video to highlight such things. But what your friend’s son is doing sounds interesting — would you like to connect us? I can imagine he’d like to join DarkSky as well.